Thursday, May 31, 2012

Stripping Roof

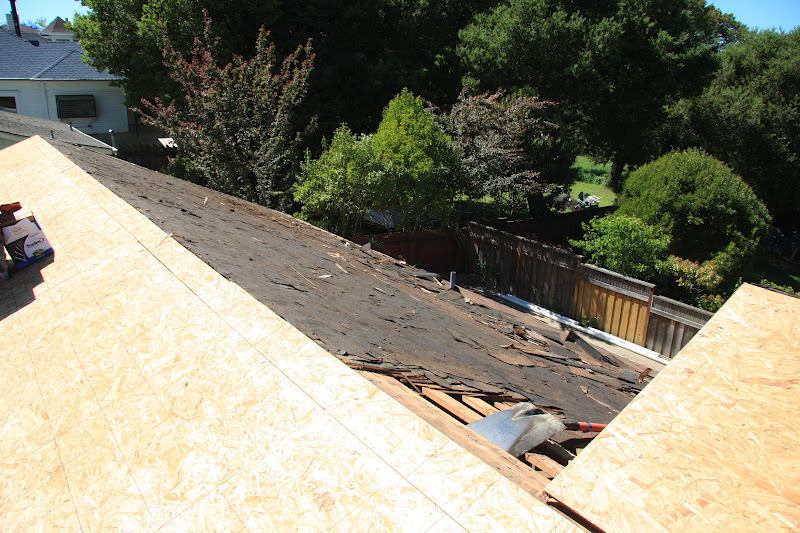
Today, I'm just showing you a bunch of "afters".  We stripped the rest of the roof on the front of the house, sheeted that, and started stripping the asphalt shingles off the backside of the roof.  I say "we", because yes, I was up there too.  Quite frankly a surprise.  I really never thought I'd be on a roof stripping shingles, as I'm not known within my family as being particularly, um, graceful.  Back in the day, I occasionally fell off my chair at the dinner table, and fairly regularly hit the doorway with my elbow, shoulder, etc, while walking into my bedroom.  True story.


Here's some roof for you.  The asphalt shingles are stripped off about 2/3 of the way down.  When stripping the shingles, you start at the top and work down.  When roofing, you start at the bottom and work up.  Once, when Sport was about 8, the only thing he asked for for Christmas was tarpaper, shingles and roofing nails.  He had built himself a fort, and needed to roof it.  So I went to one of Chris's jobs and got the roofing materials for Sport, who then proceeded to roof his fort.  After he was done, I asked him how it went and he said "The only thing I did right was start at the bottom and work up".  Live and learn.


I took this one standing on the ridge at the end of the garage.  As we stripped off the shingles, we put them in those blue trash cans, then hauled them up and over the ridge to dump them in the trailer, which you can just see at the right of the picture (by the ladder).


A closer look at the job and the tools needed to do it.  Loosen the shingles with the flat shovel, then pick them up and load the trash cans.  I have to agree with Chris, that stripping roof is now my absolutely least favorite job.  My back was killing me from working bent over, I was hot, filthy, and exhausted at the end of the day.  I really can't convey the hideousness of stripping a roof.


A bunch of shingles pulled up, but not yet thrown into the trailer.


Lets look at those shingles from the other side, shall we?
Also, funny thing, I'm a little scared of heights, and this side of the house is 2 stories off the ground.  I was so hot, filthy and exhausted that I didn't even care about the height.  Falling off the roof was the absolute last thing on my mind.


Here's the trailer, about half full of shingles.


Or maybe a little more than half full.  So hard to tell when standing on a roof.  I took this picture while on the ladder.  Much better.


Here's Chris rehydrating after the day on the roof.
One thing I didn't mention was how HOT it was up on that roof.  I got overheated and dizzy twice and had to come down and cool off.  If I had actually passed out and fallen off the roof, that would have only cemented my reputation within my family.  Oh what a hoot.


Look at my poor hot babies.


Poor ole Sport, that was a rough day.


Wednesday, May 30, 2012

Soffit

Today we're going to talk soffits.  Not a subject that regularly comes up in casual conversation, but then most of the things we discuss here are not generally found in day to day conversations.  Remember the rats?  Ah, those were the days.


Anyway, here's Chris on a ladder installing the soffit for the front porch overhang.


The soffit is made up of boards nailed over the rafters.  It's just a way of closing the open space between those rafters, and makes for a cleaner look.  Sometimes the soffit is made of sheets of plywood, but here Chris is matching the original soffit on the overhangs.  FYI, some contractors don't use soffits at all, just leave it open and paint the rafter tails.


Lets back up and look again.  So many ladders.


There's my fella again.


Here he is measuring for the last of the soffit boards.  Measure twice, cut once.


See?  Here he is cutting.  Once.  No mistakes.


Case, in his usual spot.   He likes to lay on the front porch and keep an eye on the neighborhood.


Soffit, all done.  Nice, huh?


Here's a look at the new porch ceiling and overhang soffit where it ties into the old soffit. 


Tuesday, May 29, 2012

New Garage Door


We've got multiple things going on here today.  The roof stripping and sheeting is continuing, and the door guys are here to put in the new garage door.


Here's the job - the front of the garage is stripped and sheeted, and the guys are working their way up the front of the rest of the house.  Chris says that stripping a roof is his absolute least favorite job.  It's hard on the back, because you're bent over all the time, not to mention you're always standing on a slant.


This is Dan with a sheet of OSB.  They had to leave the roof for awhile to put some OSB in the garage.


Dan  and Chris.


Chris carrying a sheet of OSB.  That's one of the garage door guys on the left.


Chris and Dan on ladders, garage door guy watching.


Way to use your heads guys.


Measuring for the garage door.


Chris measuring.


More sheets.


Nailing them up.


Here are the pieces of the garage door to be installed.


And while the guys are working, I'm picking up shingles.  This is the before.


Here's the new garage door and opener.  This is why Chris and Dan were putting up the OSB, so the garage door guys could install the door and opener.


And here's my little contribution, a clean(er) area to work in.


Friday, May 25, 2012

New Porch

Big changes, big changes today!  The guys are starting the new gable roof over the front porch.  To do so, they needed to strip the old roof away and nail up sheets of OSB.  The roof was built old style, with no sheeting.  Instead, on top of the rafters the carpenters nailed small strips of wood (1"x4') horizontally the length of the house and each one is about 12" on center  This would be called the laths.  The shingles (originally cedar shakes) were nailed onto the lath strips.  At some point, the roof was reroofed, and rather than remove the old cedar shakes and boards, then sheet the roof with plywood (or OSB, as is now used) they just put down a layer of tarpaper over the cedar shingles and then nailed the asphalt shingles on top of that.


Here's a look at the house.    That's Chris on the left, stripping away old shingles, Dan on the peak of the new porch roof, and Chip climbing the ladder.


Let's look at the new front porch.  Don't you love it?


Let me back up a little and give you a good look at the whole job.  There's Chris on the left stripping off the shingles and puttig them in that garbage can then throwing them into the trailer.  To the right, Dan and Chip are working on the new porch roof.


Hi Chris. Don't fall off.    You can see some of the old asphalt shingles, bits of tarpaper, and lots of the cedar shingles strewn about.


There's Dan and Chip again.  If you look at just this side of the new porch, you can see the old wood strips (lathes)  that haven't yet been covered with the sheeting.


Dan is getting pretty comfortable with me being on the job with my camera.


And this is what it looks like inside the house where the old roof was removed.  I foresee me on a shovel picking this up in the near future.


Same stuff, different angle.  If you look up, you can see sky through the roof.


I'm feeling particularly thorough in my documentation today, so here's the same debris from yet another angle.  As a plus, you get a good look at the entry, entry closet, end of stairway, and hallway to the bedrooms. 


Thursday, May 24, 2012

New Rooms Downstairs

 Backdownstairs we go again.  The guys have been busy.


Look down the stairs, there's a new wall down there!


Several new walls, in fact.  Here I'm standing at the foot of the stairs, looking toward one of the new bedrooms.  That open area that the outside door opens into will be a family room/TV room of sorts.  If we lived there it would totally be the boys hang out area.


Here I'm standing in the TV room looking toward the bedrooms and new bath.  The door farthest to the right is the bathroom.


This is pretty much the same picture, but you can see where the stairs end.  Thats the end of the stair wall on the far right of the picture.  Straight through, past the stairs is the access to under the house, and a small utility area where the electrical panel will live.


Here's a peek into the bedroom on the back side of the house.


And here is the other bedroom.  Thats the new section of foundation we had to pour under the window.


Here's the closet in this bedroom.  Because of the foundation, it can't extend all the way down to the  floor, but is built over the foundation and into the open area under the house.  Pretty clever, I think.


This is the bathroom.


And here's one last look at the bathroom wall.  You can see the stairs on the right, and just past them the doorway to the electrical panel room.  I am loving the new downstairs rooms.  As are the boys.  They've already staked out their rooms and planned the TV room (couch, TV, video games).  They would love to just lift this section of the house to our house and move in tomorrow.